Adjust the following options then press “create”.
Step 3
Hide the text curves in the “Outliner” by pressing (Ctrl + h).
Step 4
Select all the letters, then go to “Mesh > Combine”.
Step 5
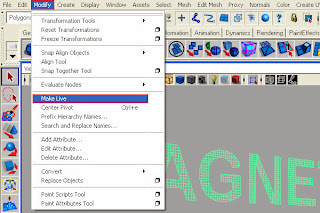
Delete the history for the shape, then go to “Modify > Make Live”.

Step 6
Switch to “Dynamics Menu” by pressing “F5”, then go to “Particles > Particle Tool (option box)”.
Step 7
Press on “Reset Tool”, then adjust the settings as shown.
Step 8
Hide your grid, switch to the front view, and start to
draw on the letters. Make sure to fill from the inside and on the
edges as shown.
Notes:
Hold the Left Mouse Button and drag anywhere to draw.
Try to draw the letters one by one (start from the edges with one stroke then fill inside with the second stroke).
If you missed a spot, press only once to fill that spot.
Avoid drawing on the same area again because intensive particle counts will make a sluggish movement.
Step 9
Press “Enter” then, in the “Attributes Editor” for the
particle shape, go to “Render Attributes > Particle Render Type >
Cloud (s/w)”.
Note: When you press “Enter” you have to wait for the program to calculate the particles.
Step 10
Press on “Current Render Type”, and set the radius to “0.025”.
Step 11
Hide the original text surface in the outliner, then open “Hypershade” and select the Volumetric Node “particlecloud1”.
Step 12
Modify the following attributes for the particle cloud:
Step 13
Extend the playback range time to “200 frames”, then select the particles, and go to “Fields > Volume Axis”.
Step 14
Modify the following attributes for the volume axis field:
Step 15
On frame “1″, set a key for the volume axis field at “Translate X” with a value of ’20′.
Step 16
Go to frame “100″ then set another key for volume axis field “Translate X” with a value of “-3.000″.
Step 17
Go to “Window > Settings/Preferences > Preferences”.
Step 18
Select the “particlecloud1” material, set its transparency to “0”, then set a key on the current frame (200).
Step19
Go to “Solvers > “Create Particle Disk Cache (option box)”.
Step 20
Make sure that the options look like following image (except for the scene directory), then press create.
Note: Wait for the particles cache to be generated, and until it stops at frame 200.
Step 21
Set the current time in the time slider to “160”, change the transparency to “1” or a “Black” color, and then
set another key.
Step 22
Repeat the last 2 steps. Set a key for
“Transparency” on frame “20” with a “white” color or a value of “0″,
then set a key with a value of “1” or “black” on frame “1”. Now show
the original hidden text shape in the “Outliner”. Go to “Display >
Show > Show Selection”, or press “Shift + h”.
Step 23
Switch to Edge Mode by pressing “Ctrl + F10”, then press delete.
Step 24
Extrude the text shape to about “0.250” on the “Z axis”.
Step 25
Center the text shape to the particles.
Step 26
Select the text, then separate the letters by going to “Mesh > Separate”.
Step27
Create 6 new “Blinn” materials with the following settings:
Step 28
Name the 6 Blinn materials as the text letters (Blinn1 = M, Blinn2 = A etc..), and then assign the first one to the letter “M”.
Step 29
Go to frame “66″ and set a key for the “M” material
“Transparency” with the color set to “White” or “0″, then go to frame
“64″ and set another key whith the color set to “Black” or “1″.
Step 30
Assign the “A” material for the second letter, then
go to frame “54″ and set a key for the “Transparency” with the color set
to “White” or “0″, then go to frame “52″ and set another key with the
color set to “Black” or “1″.
Step 31
Repeat these steps for the rest of the letters simply by using the following chart:
Step 32
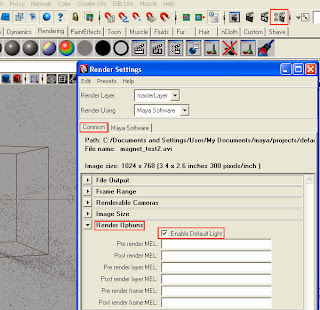
Make sure that the default light is turned on from the “Render Settings” and no other light source exists in your scene.
Step 36
You can now render the scene to video (AVI) or
sequenced images (TIFF) from any camera view, and then reverse your
animation in any video editing software (Adobe Premiere, After Effects,
Sony Vegas, etc).
Notes:
Render 1 extra
still image at frame 1 and place it at the end of the video in your
video editing program to allow the logo to appear for longer.
Changing
the Volume Axis Field attributes will show a noticeable change in the
particles motion, also using other fields will create different cool
effects.


Tidak ada komentar:
Posting Komentar